
The easy image-picking feature of the app has made your life easier. Right? With just a click, you can access the pictures from your phone’s drive and set it wherever you like. Have you thought of the code base behind its building or hire react native developer for this process? This may not be needed as in this blog, I will explain how React Native can be used to build the image-picking features in the app.
Prerequisites criteria
- Firstly, you have to set up the dev environment. You have to install the software required to build the react native app and software for the emulator along with a code editor. You can check the article to get all the detailed steps and processes of how you can achieve it.
- Before building an image-picking app, you should have a basic idea of building a basic React Native app. Check the tutorial blog to learn about creating and running a React Native app.
Third-party React Native plugin
One of the useful features that I personally prefer about the React Native framework is the option to integrate the project with the third-party library. Here, I will explain it in detail. Building apps and adding features to it may have become difficult if the framework did not support this functionality.
For this current project, you need to install react-native-image-crop-picker. Note that, you can find all other dependencies integrated with your project in the ./package.json folder. This particular package will allow you to import different functionality for the app such as cropping the chosen image, choosing multiple images, and compressing selected images. Later, in this article, you will learn how importing native React components such as ImagePicker from this package has made the codelines much simpler. You could have used react-native-image-picker but that would not have served your purpose to select the image and fit into any frame you like. So you need to understand the functionality that a third-party React Native package can offer. In this context, react-native-image-crop-picker can offer you the image cropping feature.
This is the key to making the process of building an image picker app much easier. So now let’s start with the code syntax.
Interpretation of code snippets from the ./app.js folder
The first three lines of coding:
import { Button, StyleSheet, Text, View, Image } from ‘react-native’
import React,{useState,useEffect} from ‘react’
import ImagePicker from ‘react-native-image-crop-picker’;
Specifies that I imported Button, Text, Image, View, and Stylesheet from the react-native package. I Imported useState, useEffect, and React from the react package. Lastly, the important component that you need to import is the ImagePicker from react-native-image-crop-picker. Note that you cannot use these React Native components in your codebase if you don’t introduce these in the top line of the codebase.
Let’s see what you need to include in your editor.
navigator.geolocation = require(‘@react-native-community/geolocation’);
const App = () => {
const [img,setImg]=useState()
const Handle=()=>{
ImagePicker.openPicker({
width: 300,
height: 400,
cropping: true
}).then(image => {
setImg(image)
});
- Navigator.geolocation will allow you to enable the geolocation feature in the app background.
- Then it uses the useState to define the state of the variable img. With this, you can also update its state.
- Next, it introduces a Handle function to enable the ImagePicker. The Handle function is used as the constant variable.
- The width is set as 300 pixels, the height is 400 pixels, and cropping is set as true.
- As you can see, we can use the option of cropping for integrating the third-party package react-native-image-crop-picker.
- Here, you use the setImg to save the selected image in the img, i.e. the state variable.
const cam=async()=>{
const img= await ImagePicker.openPicker({
multiple: true
})
console.log(img,’21’)
return (
<View>
{ img &&
<Image source={{uri:img.path}} style={styles.img}/>
}
<View style={styles.oneImage}>
<Button title=’take one Image’ onPress={()=>{Handle()}}/>
</View>
<View>
</View>
</View>
)
}
export default App
- Now what it specifies is that the async function, cam, takes a callback.
- I added an <View> element under the return() function. This will further render a Button and Image component.
- As it is shown the Button will have the text ‘take one Image’ which is pressable. The users will be able to press the button and activate the onPress() function. It will thereby open the ImagePicker option.
Now the last part of the code line
const styles = StyleSheet.create({
oneImage:{
marginVertical:20,
width:200,
height:35,
marginHorizontal:100
},img:{width:200,
height:200,
borderRadius:50,
marginVertical:10,
marginHorizontal:100}
})
Specifies how the StyleSheet is used to design the two elements: oneImage and the img.
Starting the virtual device on the dev system
If you are still with me in this blog, I believe you have understood the process and now let’s start with the process of running the app on the virtual device or the emulator.
- Run the command npm install and then run npx react-native run-android. This will start your emulator and install all the needed dependencies. However, you need to wait for some time until the entire process is done.
- Once the emulator starts, it will take you to the screen as shown in the image below.
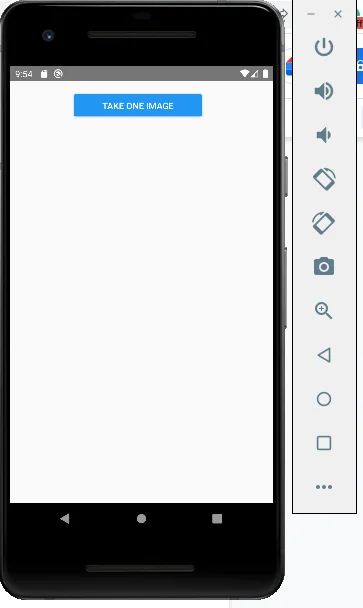
- Click on the blue button and it will take you to your local folder. Also, if you have no image in the folder, you need to download one from google. For this, you have to put in your credentials and sign into your google account and then download the image. Save it to your local folder.
- Again start the app and select the image saved in the folder. On clicking, you will open a screen similar to the image given below.
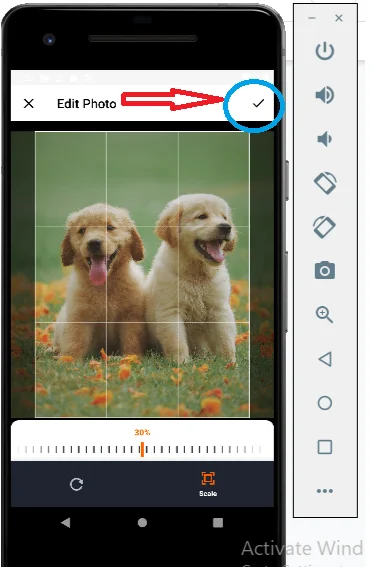
- Click on the tick and it will be saved and displayed in the frame.
Congratulations! You are done with creating an image picker app. You see that creating an app does not need much learning. But what you need is a proper knowledge of the application of React Native components, props, hooks, and states. Hope you have enjoyed the process.
Don’t forget to Read;- How To Hire The Best Website Development Solutions Company
Thank you!!